
Dogs, much like humans, need regular grooming to stay clean, healthy, and pawsitively cute. There is no way around it, your furry companion needs grooming; from baths and haircuts to nail trims and teeth brushing. You can try grooming them at home, but without a DIY dog grooming station it might be a major headache and mess. Professional groomers use grooming tables and special equipment to make the process easier and safer for everyone involved.
According to a survey conducted by the Frontiers in Veterinary Science, the most common form of grooming among dog owners is at-home grooming (41%), followed by taking dogs to a full-service salon (30%), mobile grooming service (9%), retailer (8%), and self-service center (6%).
As you can see, grooming is one of the major costs of owning a dog but regularly taking your dog to a professional groomer can get expensive! Not to mention, it can be a nerve-wracking experience for many dogs.
So, building your DIY dog grooming station at home is a great alternative! It is a relatively simple DIY project that saves dog owners money and stress over time.
What to consider when planning your DIY dog grooming station:
- What type of grooming does your dog need? Do they have long hair that needs to be trimmed? Will their ears and eyes need cleaning? Do their nails need trimming? What are the top 5 doggo parts that need to be groomed to achieve ‘clean dog’ status?
- How big is your dog? The size of your dog will determine the size of the table and grooming arm you’ll need.
- Where will you set up the station? The space you work with determines what kind of station you can create. Some of the best places to set up your grooming station are the laundry room, bathtub or shower stall, a spacious indoor bathroom or outdoor shower area, garage, or backyard. Take dimensions of the space where you will set up your grooming station so that you know how large the grooming station can be based on the room size.
- How does your dog like the grooming process? Some dogs hate bath time and being groomed, so you should take extra measures to ensure both are safe and comfortable. If your dog is very calm and sits still during grooming than you might prefer to forego the ‘grooming arm’.
- What are the steps to groom your dog? Before getting started, get a piece of paper and list out the steps that you will take to groom your dog (including the bathing part too). This will help you gain clarity on the tools and resources you’ll need access to during the grooming process and the best place to set up your grooming station.

The grooming process can be a terrifying experience for dogs. As their mom or dad, you are a source of safety and security for them, but that doesn’t mean they won’t struggle.
The Frontiers survey also found that dog owners who groomed their dogs at home were more likely to report grooming-related concerns such as skin irritation, hair matting, and nail problems than those who used professional services. So let’s review some safety measures before we get started creating your dog grooming station.
Safety measures to take when using a homemade DIY dog grooming station:
Protect yourself and your furry friend through a few simple precautions. First, ensure you are prepared by researching and wearing clothing that will protect your arms from scratches or bites.
Protect your pup by making the table slip-proof; the grooming loop (aka grooming noose or table arm) holds them tight without straining their heads. If your dog does not try to nip or bite during grooming and remains calm and generally sits still during grooming session, you may prefer to use a grooming table without a grooming arm and grooming loop.
However, if your dog is like many dogs and they tend to squirm away, nip at you, or try to jump off the grooming table, than a grooming loop around their upper and lower body will help to keep them safely secured on the grooming table.
If you have a squirmy dog who is a challenge to get to hold still while grooming, here are some groomer tricks to get your dog to calm down and be still while grooming them.
Tips to calm your pet while grooming them:
- Exercise your dog before grooming: Take them on a long walk before grooming them, get their zoomies out!
- Give them their favorite dog bone or toy: Lay their favorite dog bone, rawhide or toy on the grooming table while grooming them to distract them.
- Give them a calming supplement: If your dog gets anxious when its grooming or bath time, plan ahead! Give them a calming supplement or even a CBD supplement for dogs to calm their anxiety and energy.

While grooming them, stay alert and attentive to your fur-baby’s needs. Look out for signs of anxiety or aggression and do whatever you can to ease their nerves. If that means ending early or moving more slowly, do it!
Be extra careful when trimming or combing around their eyes, ears, and paws. These are sensitive areas! Your dog is likely to flinch or snip at you, which might lead to you hurting them accidentally.
Also, if you plan to use a hair dryer to dry your dog’s wet fur, make sure it’s on a low setting and positioned at a safe distance from their skin.
Lastly, four hands are better than two. When possible, have a second set of hands ready to help when grooming your dog. This doesn’t apply to the groomee though. Eight paws are not better than four in this equation. If you have more than one dog, only groom one dog at-a-time.
Never ever leave your dog alone on the grooming table or station or with a grooming loop or leash attached to them.
Supplies needed to build your DIY dog grooming station:

- You will need a table where you will do the actual grooming. Make sure your dog will fit on it comfortably, it’s a height that won’t hurt your back, and it’s rated to handle your dog’s weight.
- Grooming arm and loop that you can attach to the table and use to secure your dog. It is typically an ‘L shaped’ or ‘U shaped’ or ‘H shaped’ bar attached to the ends of the table with clamps. The ‘H-shaped’ grooming arms are ‘U-shaped’ with adjustable height. You gently secure your dog to the bar using one restraint (or loop) hooked to their collar or one grooming loop around their neck and, if needed, one grooming loop around their hips.
- Table clamp (if you’re using a grooming arm) to attach the grooming arm to the grooming table.
- Basic grooming tools for trimming, clipping and cleaning your dog’s coat, eyes, ears, nails and teeth. It’s best practice to have a side table next to your grooming table where you lay out your grooming tools before getting started.
Here’s a list of a few grooming tools to make your life easier.
- Clippers and scissors
- Cotton balls and ear cleaner
- Eye wipes
- Slicker brush
- Nail trimmer
- Shampoo
- Conditioner
- Blow dryer
- Waterspout/sprayer that makes it easier to bathe your dog
- Smock for groomer to wear over their clothes
- Spray bottle filled with clean water
- Additional towel
Note: We like keeping all our tools and supplies in a shower caddy or storage bin. It makes storing, carrying around, and keeping track of your equipment easier. Also, next to our dog grooming station we set up a side table where we lay out all of our grooming supplies for quick and easy access.
DIY Dog Grooming Station Types
1 – DIY Dog Grooming Table for Small to Medium Dogs

Step 1: Find a table that is appropriate for your small dog.
You want it to be large enough that your little pup won’t fall off if they squirm or get nervous and small enough that you can easily reach every inch of them without straining. Your dog must be within arm’s reach, so make sure it is tall enough to bring your small dog up to where you need them. A small folding table should work perfectly.
Step 2: Make the surface non-slip.
Cut down a yoga mat (rubber mat or similar material) to fit the tabletop. If it slips around, try gluing the mat down to add extra security.
Step 3: Attach the dog grooming arm.
You can find an appropriate grooming arm at your local pet store or online. Also, you can build one yourself using supplies found at the hardware store. The arm can be attached to the tail ends of your table using a clamp. We will give instructions for making a DIY grooming arm at the end of this article.
For small dogs, we recommend an L shaped grooming arm with a single grooming loop or mini-leash that can secure your little one without straining them.
Note: This grooming table is not for bathing!
While both grooming and bathing may be done in the same area, a grooming station is different from a bathing station.
A grooming station is typically a table or platform where you can safely secure your dog while brushing and trimming their fur, clipping their nails, brushing their teeth, and cleaning their ears. On the other hand, a bathing station is typically a tub or sink where you will use lukewarm water and dog-safe shampoo and conditioner to clean your dog’s fur and body.
Think of the grooming station as the fur zone (dry area) and the bathing station as the splash zone (wet area). Be prepared for lots of fur floating around in the fur zone and lots of water flying off in every direction in the splash zone. Both areas are best if situated near a sink or tub for access to water.
2 – DIY Dog Grooming Station for Large Dogs

Step 1: Find a table that is appropriate for your large dog.
Large dogs do not need to be raised very high. A sturdy (used) coffee table or wooden pallet with plywood secured to the top is a perfect way to lift your big dog to a comfortable height for both of you. Ensure the object can handle your dog’s weight and the surface is appropriate to your dog’s size and allows you to access them on all sides easily.
Step 2: Make the surface non-slip.
Cut down a yoga mat (rubber mat or similar material) to fit the tabletop. Use adhesive spray to secure the mat to the tabletop.
Step 3: Attach the dog grooming arm.
You can find an appropriate grooming arm at pet stores or build one yourself using supplies found at the hardware store. The arm can be attached to the tail ends of your table using a clamp. We will give instructions for making a DIY grooming arm at the end of this article.
For large dogs, we recommend grooming arms with two security straps, or “grooming loops,” one for the head and one for the hips. You will need a U shaped grooming arm or an H shaped grooming arm.
Note: This grooming table is not for bathing!
3 – Low-to-no Cost DIY Dog Grooming Station

With a bit of elbow grease and a few tools and materials you can find at your local hardware store, you can easily transform resources you already have into a grooming table.
Dig through your garage, storage shed, or browse the ‘free’ section on Craigslist or Facebook marketplace to find:
- A durable table that is the right height, sturdiness and size for you and your dog (modify one if needed).
- Materials to build and attach your grooming arm and loops to your grooming table. See the instructions below.
- A non-slip material mat to glue to the tabletop.
Note: This grooming table is not for bathing! Also, if your dog easily stays still and doesn’t try to squirm off the grooming table, you might not even need the grooming arm.
4 – Laundry Tub or Bathtub Dog Grooming Station

Where you bathe your dirty dog can double as a grooming station!
You can easily convert your bathtub into a functioning 2-in-1 grooming and bathing station.
- If your bathtub has an edge or lip, you can clamp your grooming arm to the side. Just ensure the clamp has a safe foam or rubber inside so that it doesn’t damage the tile or tub.
- If there isn’t a way for you to attach an arm to the tub, you could use a tension bar, like you would use to hang your shower curtain, then attach a grooming loop to the tension bar.
- Before trimming your dog’s fur, put a shower drain hair stopper or bathtub hair catcher over the drain so that you can easily spray the clipped fur to be collected in the drain protector.
- Convert the waterspout of your tub into a hand-held shower sprayer. You can find bathing hose kits that are easy to install online or at your local pet supply store.
Note: If your dog likes the water or, at the very least, doesn’t struggle when bathing, you might not need the grooming arm in this grooming station set up.
DIY Dog Grooming Arm for Dog Grooming Table
There are two types of dog grooming arms. The first is an L-shaped arm that reaches about halfway across the table. The second is a U-shaped or ‘H-shaped’ bar extending across the table.
You can buy a decent one online or make a custom one yourself. Most DIYers can quickly build a grooming arm with the proper planning and materials.

Step 1: Plan it out.
Measure your table and dog to determine the length and height. You will want the height of the grooming arm to be about a head taller than your pup when they’re standing.
Write down the dimensions of the materials you’ll need to find or purchase from the hardware store.
Step 2: Buy your materials.
Head to your local hardware store and pick up some PVC pipe and an adjustable clamp. The diameter of your PVC pipe and the quality of your clamp will determine the durability of your grooming arm, so keep that in mind when shopping (you can switch out PVC pipe for metal pipe if you prefer more stability).
Don’t forget to buy elbow joints to connect the top and bottom pipes! And make sure the pipe fits snuggly into the adjustable clamp. You can purchase plumber glue to properly seal your joints for better durability.
Finally, you need to get grooming loops and hooks (to attach the grooming loops to the arm) that screw into the top PVC pipe of the grooming arm.
Materials needed:
- A sturdy PVC or metal pipe to create the vertical arm (such as a galvanized steel pipe)
- A table clamp that fits the vertical arm’s pipe’s diameter snugly. If you can’t find a table clamp that holds a pole, you can always secure the vertical arm into a base and clamp the base to the table with basic table clamps like this video shows.
- An elbow joint to make an L-shaped bend in the pipe and connect the vertical arm to top arm
- A sturdy PVC or metal pipe to create the top arm of the grooming arm
- An eye hook that can screw into the top arm to hold the grooming loop or noose
- The proper size screws, nuts, and bolts to assemble the parts
- A pipe cutter or saw to cut the pipe to size
- A drill and proper size drill bits to make holes for the screws
We love this tutorial that DIY Dave provides for creating a grooming arm:
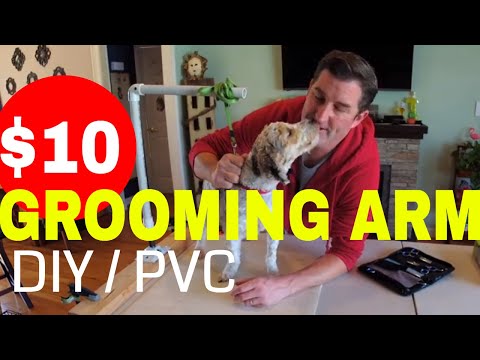
Step 3: Build it!
Piece it all together! The actual building process will depend on the style you choose to create and the grooming station location. Use images of store-bought grooming arms as references.
We have provided the instructions for creating an L-shaped grooming arm with one grooming loop attached.
Grooming Arm Assembly Steps:
- Cut the PVC or metal pipe to the desired length for the vertical grooming arm. You will need to determine the appropriate length based on the height of your grooming table and the size of the animal you will be grooming.
- Attach one table clamp to the bottom of the pipe, securing the pipe with the clamp’s tightening screw. This clamp will be used to attach the grooming arm to the table or work surface.
- Attach the elbow joint to the other end of the pipe, using screws or plumber glue. Make sure the joint is securely fastened.
- Cut another length of pipe for the top part of the grooming arm.
- Attach the top grooming arm pipe to the open end of the elbow joint, using screws or plumber glue. The top grooming arm should be perpendicular to the vertical grooming arm pipe, completing the “L” shape of the grooming arm.
- Attach the eye hook to the underside of the top grooming arm, using screws, nuts, or bolts. This will be used to hold the grooming loop.
- Attach the grooming loop by clipping it to the eye hook.
- Test the stability and functionality of the grooming arm before use.
Note: It is important to use high-quality materials and ensure that all joints are securely fastened to prevent injury to the animal during grooming.
Never leave your pet unattended while on a grooming table, laundry tub, bathtub, shower, bathing station, grooming station or attached to the grooming arm with a grooming loop or noose!
In our experience
You can have professional results from home with some planning and preparation. No two dogs are the same, and building your DIY grooming station allows you to tailor the station to fit your dog and your lifestyle.
Every home layout and design style is different, when you DIY your dog’s accessories and equipment you can integrate them into your layout and decor better. Don’t overlook other accessories such as your dog’s crate or DIY dog ramp for outdoors! You can build a DIY dog crate cover so it seamlessly fits in your living space and provides your pup with a cozy place to relax.
When you take the time to list out the steps to groom your dog, gather the grooming tools and resources, and designate a grooming and bathing station, you can achieve a professional wash and professional grooming results.
Whether pet owners want an easier way to clean their dirty dog or a complete set-up to properly trim your pup, building a home grooming station is an excellent solution.


